Grader introduction

OCULOLABEL

This short guide explains the grading workflow. The platform has two project modes: OCT for OCT image data and CFP for color fundus photographs.
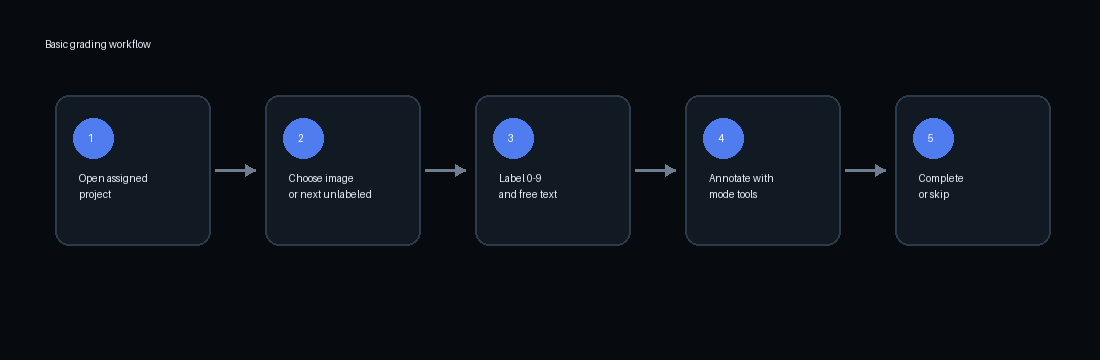
Basic grading workflow

Basic Workflow

1. Sign in

Sign in with the username and password provided by the study administrator. Your account determines which projects you can see and edit.

2. Open a project

Regular graders only see projects assigned to them. Admins can see all projects and manage user access.

3. Grade the image

Add the required label, free-text comment, and annotations. Changes are saved automatically.

4. Complete the image

Use Completed (C) when the image is finished. Use Skip (U) if the image should be reviewed later.

Project Instructions

Instructions Button

If project-specific instructions were uploaded, the top bar shows an Instructions button. Use it to view the PDF or HTML guide for the current project.

Opening PDFs

If a browser does not display the PDF inside the dialog, use Open in new tab. It opens the same instruction file in a separate tab.

Project Source

For Google Drive projects, graders only see that the project uses a Google Drive image set. Internal Drive source addresses are not needed for grading.

OCT mode

OCT Grading

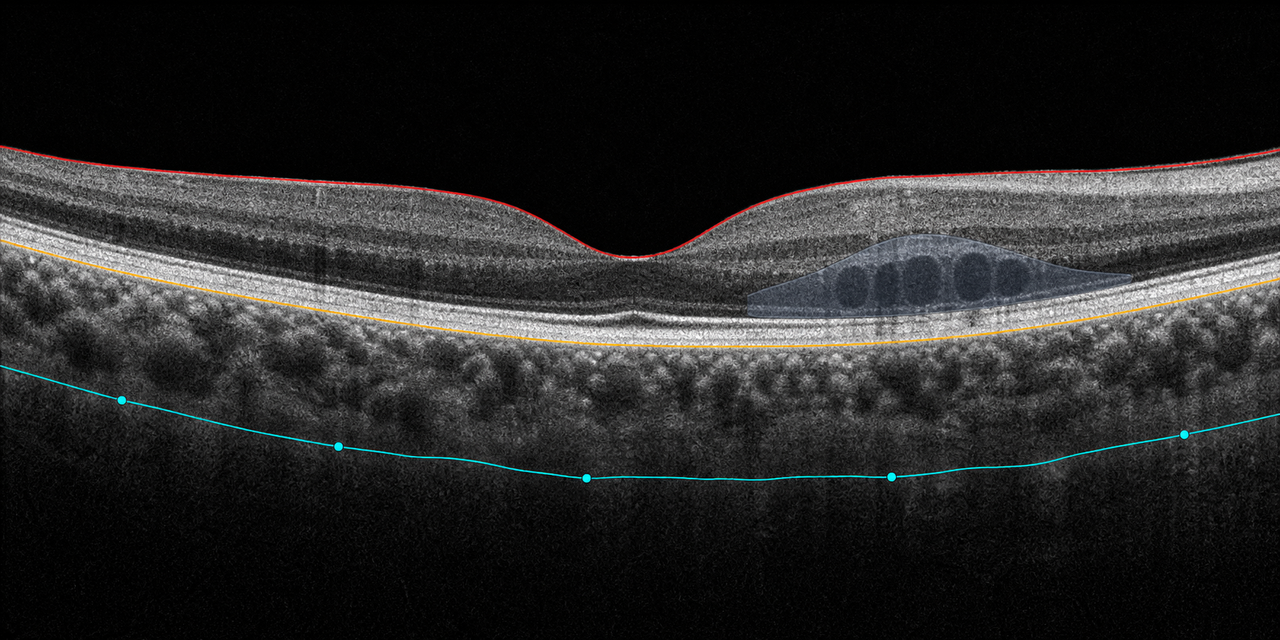
OCT mode is intended for B-scans and OCT image series. It includes classification, free text, retinal boundaries, lesion annotation, brush masks, and B-scan navigation.
Available tools

  • Label 0-9: numeric image label according to the project schema.
  • Free text (F): comment for the current image.
  • Dot (D): individual points, for example HRF, small lesions, or vessel points.
  • Line (L): trace linear structures.
  • Boundary (B): place support points for retinal or choroidal boundaries.
  • pBoundary (P): create a horizontal 100-point boundary and adjust it by tracing the structure.
  • Brush (Q) / Eraser (E): draw or correct area masks.
  • Polygon: outline lesions or regions.

Typical OCT workflow

  1. Select the correct layer or annotation class.
  2. Mark retinal layers with pBoundary or Boundary.
  3. Mark lesions or additional loci with Dot, Polygon, or Brush.
  4. Correct mistakes with Undo/Redo or Eraser.
  5. Press Completed (C) when finished.
OCT example with retinal boundaries and lesions
OCT mode example: retinal boundaries, Dot markers, and lesion regions.

CFP mode

CFP Grading

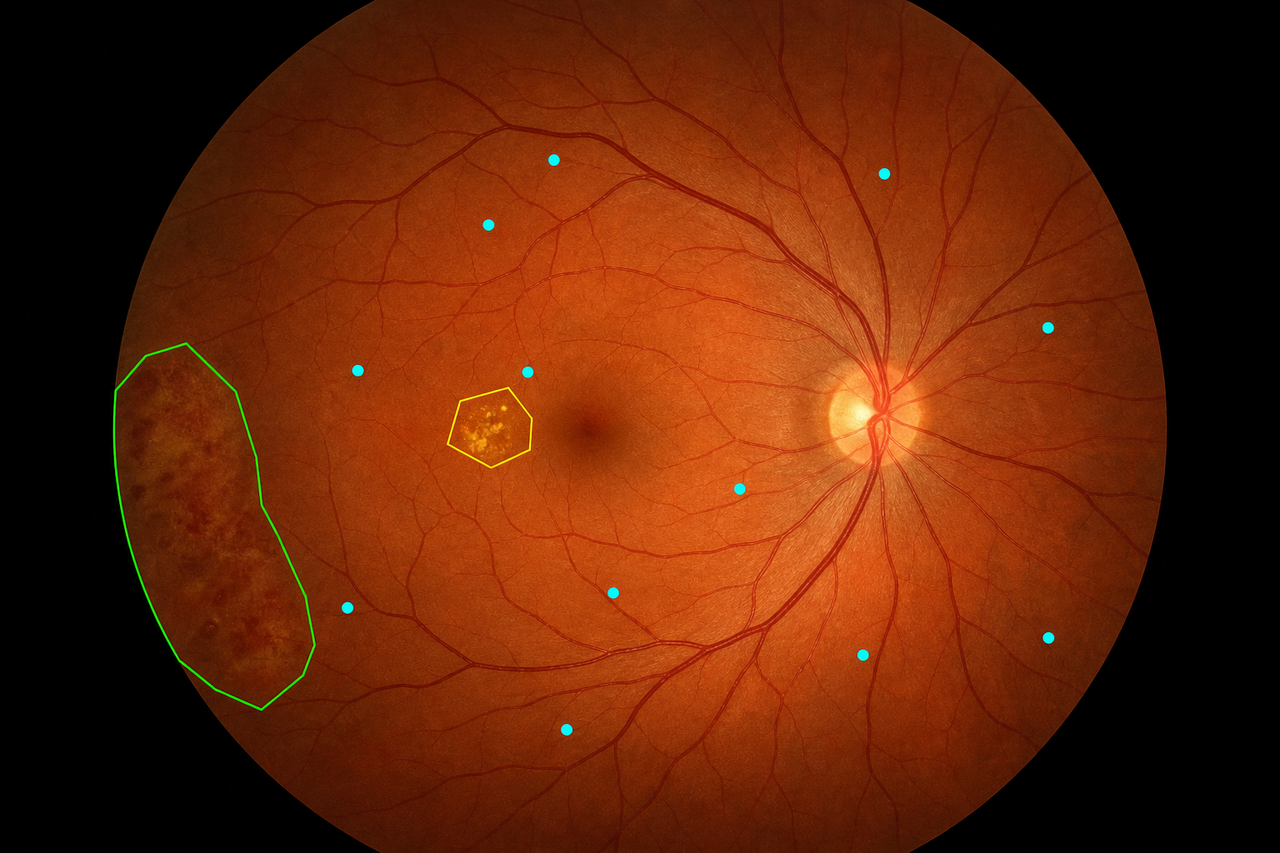
CFP mode is intentionally simpler. It is intended for color fundus photographs where classification, free text, point markers, and polygon areas are needed.
Available tools

  • Label 0-9: numeric image label according to the project schema.
  • Free text (F): finding note or comment.
  • Dot (D): mark individual lesions, landmarks, or vessel points.
  • Polygon: outline a lesion, optic disc, vessel region, or other area.
  • Undo / Redo: correct recent drawing steps.
  • Finish drawing: complete the active polygon drawing.

Typical CFP workflow

  1. Assign the numeric label.
  2. Add a free-text comment if needed.
  3. Use Dot for individual findings.
  4. Use Polygon for visible regions or areas.
  5. Press Completed (C) when finished.
CFP example with Dot markers and Polygon
CFP mode example: Dot markers and a Polygon region.

Keyboard Shortcuts

N Navigation F Free text D Dot L Line, OCT only B Boundary, OCT only P pBoundary, OCT only Q Brush, OCT only E Eraser, OCT only C Completed / uncomplete U Skip X Image error Delete delete selected annotation Ctrl + Z Undo Ctrl + Y Redo Enter Next unlabeled image

Status

Unlabeled

The image still needs grading.

Labeled

A numeric label has been assigned, but the image may not be fully completed.

Completed

The grader has finished the image.

Skipped

The image was deferred and can be opened again later.